Monday, July 20, 2015

Stampin' Up! Watermelon Pear Watercolor Wings

Today's card was inspired by the challenge over at Colour Me (a color challenge: Watermelon Wonder, Pear Pizazz, and Soft Sky) and the sketch challenge at Just Add Ink.

I used the Watercolor Wings stamp set and then cut out around the butterflies and mounted them with a Stampin' Dimensional.  I stamped the greeting on a 2-1/2" circle and layered that on a couple of colored banners (the edge was punched with the hexagon punch--I need to order that new banner punch).  The Soft Sky card stock is textured with the Fluttering embossing folder and everything is layered on a white card base.
Pin It

JAI #271

Saturday, July 18, 2015

Stampin' Up! Remarkable You Flower

Lately I've been able to play with the new In Colors a bit more and I'm finding a lot of color combinations that I like with them.  Today's card uses Mint Macaroon and Watermelon Wonder, and is inspired by the Photo Inspiration Challenge over at Stampin' Royalty.  Since there were so many fun things in the new Stampin' Up! Catalog and my budget was limited, I didn't get a chance to order the new In Color Markers yet.  I was kicking myself after ordering this set, but then I realized that I could pull out my (long forgotten) trusty blender pens.  I colored the flower image in by squeezing the ink pads so that some color was on the lid and then I picked up the color with the blender pen.  I think I should do this more often because it allows me to get varying shades of the color as opposed to the single color from the markers (see the flower petals with a bit of shading).

I mounted my stamped panel on Watermelon Wonder and Basic Black, then tied some white stitched ribbon around it.  I added a strip of Mint Macaroon card stock along the side of my white card base and then ran the whole thing through my Big Shot with the Fluttering embossing folder.
Pin It

Friday, July 17, 2015

Stampin' Up! Bold Build a Birthday

I've been a long-time fan of Stampin' Up!'s Designer Series Paper Stacks, and this year's new designs do not disappoint!  The bold white polka-dots are so fun and versatile!  I used that pattern in Bermuda Bay for the background on this card.

I combined the color challenge  from Hand Stamped Sentiments
with the sketch challenge at Pals Paper Arts.

I used the Build a Birthday set to stamp the candles in Bermuda Bay, Blushing Bride, and Watermelon Wonder.  I stamped the "Happy Birthday" from the Tin of Card photopolymer set in Watermelon Wonder.  I punched out the candles with the 2" circle punch and layered it on the 2-3/8" scalloped circle punch.  For the greeting strip and the Watermelon Wonder strip, I cut them with the paper trimmer and then punched the end with the hexagon punch to create the banner shape (I really need to get one of those new triple banner punches!)  I wasn't sure about this color combination, but I love how bold and fun it is!
 Pin It

PPA260


Thursday, July 16, 2015

Stampin' Up! Sandy Mint Garden in Bloom


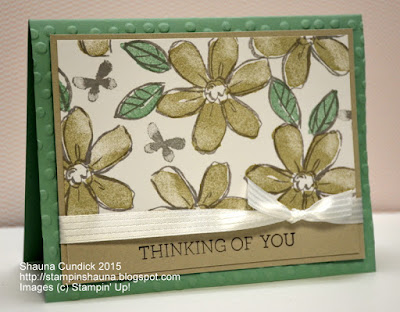
Once again it's been too long since I stamped!  I finally managed to make a few cards for some blog challenges (and for fun), and here's the first one.  I played along with the color challenge at The Paper Players and used Mint Macaroon, Sahara Sand, and Smoky Slate.

I stamped the flowers from the Garden in Bloom stamp set and the greeting from the Crazy About You set.  The background is textured with the decorative dots embossing folder.  To finish off the card, I tied some white stitched satin ribbon around the stamped panel.
 Pin It

Monday, July 6, 2015

Stampin' Up! Mother's Love Thanks

Most of the time I try to post ideas here on my blog that are made with current Stampin' Up! stamps, but occasionally I'll share cards made with stamps that have recently retired.  I made this card with the Mother's Love set that was in the 2015 Occasions Catalog.  I love this set and thought it was perfect for the flower themed challenge at Stampin' Royalty this week.

I stamped the stems for the flowers in Mossy Meadow and then stamped the flower part in Blackberry Bliss.  I textured the background with the Spring Flowers embossing folder and added a strip of Mossy Meadow DSP along the edge.  I tied some Blackberry Bliss stitched satin ribbon around the inner edge of the card and added just a small a piece of Mossy Meadow ribbon to it before tying the knot.  My "thanks" comes from the Crazy About You stamp set and I punched it with the decorative label punch before tucking it behind my stamped panel.

 Pin It

Wednesday, June 24, 2015

Stampin' Up! Garden in Bloom Butterflies

Other projects have been demanding my free time lately (aka nap time), so to have a little stamping time I had to go downstairs once the kiddos were all in bed.....way past their bedtime and mine!  I do admit, I had a lot of fun creating with Stampin' Up!'s new Garden In Bloom set again. I would have stayed up a while longer to keep creating, but I realized that my cute little alarm clocks always come wake me up so there will be no catching up on lost sleep.  So, one card is all I made, and I'm okay with that. 

This card is for the Picture Inspiration Challenge over at Stampin' Royalty.  Immediately I was drawn to the fun colors, so I created this card with Calypso Coral, Daffodil Delight, and Pear Pizazz.  I stamped Coral butterflies on my Coral card base and white butterfly outlines on my Pear layer.  I added some Daffodil paper from the new Brights DSP stack and layered that onto some white card stock (the bottom edge is done with the tiny wave rotary blade for the Stampin' Trimmer).  For my main panel, I stamped the outlines in Basic Gray.  The "thank you" is from the Work of Art set.  Each new catalog I find some great new go-to sets, and this Garden In Bloom set is becoming a fast favorite!  I can't wait to use it more!

 Pin It

Wednesday, June 17, 2015

Stampin' Up! Coral Blue Watercolor Wings

This week I had a few minutes to try out more new stamps.  Today's card features the new Watercolor Wings photopolymer set along with the new Fluttering embossing folder.

This week's challenge at Stampin' Royalty is a color challenge (Lost Lagoon, Soft Sky, Crumb Cake, and Calypso Coral).  Sometimes I get stuck in a rut and stick with the same few colors, so it's fun to play along and try out some new color combos.  I used the four challenge colors along with some white card stock and ink and this is what I came up with.

I stamped the solid butterfly from the Watercolor Wings stamp set with my Whisper White craft ink to help the butterflies stand out a little on the Crumb Cake card stock.  For the blue butterflies, I stamped the inner layer with Soft Sky and the outline layer with Lost Lagoon.  For the coral butterfly, I stamped another inner layer as well as the outline layer in Calypso Coral.  For the greeting I stamped it in white first and then in Lost Lagoon (the white helps it stand out a bit).  I textured the Soft Sky card stock with the Fluttering embossing folder and added some Calypso Coral seam binding ribbon around it before mounting it onto the Crumb Cake card base.

 I know the Watercolor Wings set has a lot of potential and I can't wait to try it out some more.  Check back soon for more ideas :)


 Pin It

Wednesday, June 10, 2015

Stampin' Up! Garden in Bloom Box

Summer is here!  Last week my order of new stamps arrived but I didn't have much of a chance to play with it because of all the last week of school festivities.  Even though I didn't get to use my new stamps, I had a lot of fun reading to first graders, spending an afternoon in the sun helping with Field Day, and making last minute thank you gifts for teachers, staff, and administrators.  I can't believe that another school year has already come and gone!  Now we have 11 weeks of Summer until we're back in the school routine, I'm sure they'll fly by.

On Monday I was hoping to take advantage of some nap time stamping, but instead spent the time trying to help my older two establish some Summertime routines.  So, once everyone was in bed for the night (and unfortunately it was an hour or so later than their usual bedtime), I finally had the chance to use some new product.  I decided to start out by making a project for the challenge over at Stampin' Royalty.  This week's challenge is to make anything but a card, so I came up with a fun little box that features the new Garden in Bloom photopolymer stamp set.  I love this stamp set, it reminds me of so many fun 2-step stampin' sets that were around maybe 15 years ago (the type of sets that really made me fall in love with Stampin' Up!).  I almost felt like I was stamping with a long lost friend when I used them, and it felt good to be back together!

I started out by cutting a sheet of white and a sheet of Soft Sky card stock down to 6"x6".  For the bottom of the box, I scored the Soft Sky card stock 1-1/16" from each edge and then cut the corners and folded it into a box.  That way the width of the box was almost 4" square.  For the top of the box, I scored the white card stock at 1" from each side (that way it would be just a tiny bit bigger than the base and then it would fit over the base easily).  I wanted some of the color from the base to show, so after scoring, I trimmed 1/4" off each side.  In the past I've tried cutting the lid smaller to begin with, but I find it's easier to figure the math if I score first and then cut (and then I waste less paper from mistakes).  I stamped images from the Garden in Bloom all over the lid of my box before folding it.  I used Melon Mambo/Pink Pirouette, Crushed Curry/So Saffron, Pacific Point/Soft Sky, and Cucumber Crush/Cucumber Crush stamped off once. 

For the tag, I stamped the word "enjoy" from the Endless Birthday Wishes photopolymer stamp set in Melon Mambo and then stamped the small butterfly images from the Garden in Bloom set.  I punched that out with the oval punch, then layered it on some Pink Pirouette punched with the scalloped oval, and finally layered that onto some Soft Sky punched with the decorative label punch.  I punched a 1/8" hole into my tag so that I could tie some ribbon through it.  I used Melon Mambo cotton ribbon to tie my box closed, and instead of putting one end of the ribbon through my tag hole, I brought both sides up through it so that my bow would sit completely on top of the tag.  Have you used your stamps to make something besides a card lately?
 Pin It


Tuesday, June 9, 2015

Stampin' Up! Petite Petals Gift Packs

What was I up to last week?  It was the last week of school and I spent more time at the school than usual.  I was hoping to make a bunch of packs of cards (6 in each pack) to use as thank you gifts for teachers, staff, and school administrators.  The week flew by and Friday came and I still didn't have the packs made.  I looked thorough my stash of cards and realized that I didn't have enough cards so I thought that I'd have to just let it go this year.  Well, on Friday our whole family joined my daughter's school at the last day of school concert (an awesome concert in the park with a couple of real musicians).  After the concert, we came home and my little one took a nap.  I got this crazy idea that I could bust through a bunch of cards in the 2-3 hours until school was out.  So, I enlisted my preschooler's help and we went to work!

I decided on these "you made my day" cards that I had designed a few months ago, but I changed up the greeting and colors.  Instead of giving everyone an assorted pack, I chose to make each pack have just one main color.  Did you know that preschoolers are excellent punchers and they actually enjoy giving free labor?  My little guy punched out 72 flowers in no time and then he proceeded to peel of Stampin' Dimensionals so that I could adhere all of the colored flowers to my cards.  I honestly couldn't have finished these cards without him.

All of the cards have a white card base and then a Soft Sky background.  I stamped "you made my day" from the Best Day Ever Sale-a-Bration set.  I added some green stems from the Painted Petals stamp set and then punched that out with my 2-1/2" circle punch.  I added the flowers punched with the Petite Petals set and then added a little rhinestone jewel in each center.  On the Soft Sky background, I stamped the bokeh stamp from the Best Day Ever to fill it in a bit.  Then I tied some coordinating ribbon around the card stock before adhering it to my white card base.

I finished with a little time to spare, so I decided that my card packs needed some tags to go with them, so I made 3x3 cards using the Decorative Label Punch, the Painted Petals set, and the Petite Petals punch.  I'm glad I had a few spare hours so I could do a little something for those that do so much for the kids at the school.  Nothing like doing things at the last minute, but if it wasn't for the last minute, a lot of things wouldn't get done!

 Pin It

Wednesday, June 3, 2015

Stampin' Up! Father's Day Stars

I'm excited!  This month I have the privilege of being a Guest Designer for one of my favorite blog challenges Stampin' Royalty.  Today's challenge at Stampin' Royalty is to create a Masculine Project.  What perfect timing--just before Father's Day.  Go ahead and join us this week so you can get your Father's Day cards done before the last minute.  I admit, I struggle a bit with the masculine cards.  I guess I just love the bright and girly colors more and I love adding ribbon to my cards.  Well, I successfully created a card without flowers and frills (although I was very tempted to sneak in some ribbon, but I resisted).  My card even got my husband's seal of approval.

Speaking of my husband, he has been pretty supportive of my hobby (addiction?) for the past 13 years.  When my husband and I were dating, my sister strongly suggested that I not show him my craft room until after I had a ring, she thought I'd scare him off--and I thought I had a lot of craft stuff then.  When we were engaged, he took me out for my birthday and drove me 30 minutes in the opposite direction from our destination just so I could go get a new catalog to look at (my downline got hers that day and I couldn't wait to see it) and then put up with me scouring the catalog instead of paying a lot of attention to him the rest of the drive.  He's always thought that the Stampin' Up! colors have silly names and he likes to poke fun of them at times.  He never liked it when a color was called what it wasn't (Not Quite Navy, Almost Amethyst) because he said that they should call a color what it is instead of what it isn't.  When I told him I was making a masculine card for this blog challenge, he initially suggested that I use Gross Green and Beautiful Brown, but then changed his mind and thought of colors such as Gorgeous Green, Galactic Green, Burly Brown, or Righteous Red.  I laughed and quickly wrote his suggestions down because I knew they'd be great for a blog post :)  The funny thing is, sometimes he's actually pretty good at guessing the color names.  When we had been married for just two years, we were in Walt Disney World and he commented that one of the monorails looked like it was Luscious Lemon and Stampin' Up! used to have a color called Luscious Lime.


I decided to go along with his suggestions when picking the color scheme for this card, so I used Mossy Meadow and Crumb Cake.  Now don't those names just scream masculine, lol?  At least the actual colors do, they give me a National Park kind of feel.  I used the Pictogram Punches stamp set for the star and punched a few out with the star from the Itty Bitty Accents Punch Pack.  I absolutely love Stampin' Up!'s Textured Impressions Embossing Folders, so I used the Lucky Stars embossing folder on the white card stock.  I cut out the "happy" with the Hello You thinlits and stamped the "Father's Day" from the Crazy About You stamp set.  I'm so happy that the thinlits and stamp set both made it into the new Stampin' Up! Catalog.  I cut the banner by cutting a strip of card stock and then punched the end of it with the hexagon punch to give it the banner shape.  However, now they have a nifty new banner punch to make it even easier!  I just need to get my hands on one of those punches. 

Thanks for stopping by.  Come back and visit again!  And, Happy Father's Day in a few weeks to all of you fathers out there, especially to the father of my kids!

 Pin It

Saturday, May 30, 2015

Fresh Dots and Petite Petals

Have you seen the new Stampin' Up! In Colors yet?  I've had a little bit of time to play around with them and I think my favorite (at least for now) is Watermelon Wonder.  I've loved Calypso Coral for a while and Watermelon Wonder seems to have the same vibrancy but just a bit more red in it.  Lately I'm finding that Soft Sky is becoming one of my go-to colors as well.  I have to be honest, I've had Soft Sky in my collection since it first debuted several years ago, then I dusted it off when it became a regular Stampin' Up! color, and I haven't used it much until the past few months.  Perhaps I was thinking it had to be used alongside pastel colors, but I'm quickly learning how great it goes with vibrant and bold colors as well!

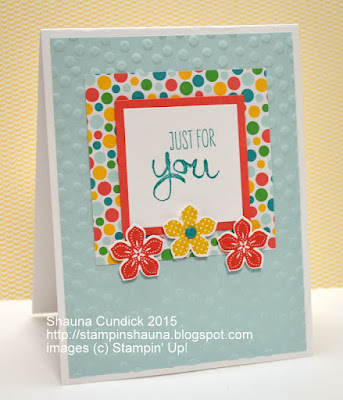
I made this card to go with the sketch over at Freshly Made Sketches this week.  I stamped the greeting with the Work of Art stamp set using Bermuda Bay ink.  I stamped flowers from Petite Petals in Crushed Curry and Watermelon Wonder and then punched them with the coordinating punch.  I added a little Bermuda Bay candy dot to the center of the middle flower.  To frame in my greeting, I layered it on Watermelon Wonder card stock and then onto some of the new Cherry On Top DSP.  I thought the colored dots were just so fun and summery (which was perfect for today's summery weather--the hottest day of the year so far)!  I textured the Soft Sky card stock with the Decorative Dots embossing folder and then layered everything onto a white card base.  I love this simple sketch because it focuses on the words but then adds a bit of pizazz around the greeting.

 Pin It

Friday, May 29, 2015

Bright and Bold Build a Birthday

I just typed out the title for this post "Bright and Bold Build a Birthday" and that's a lot of Bs!  I figured that was the best description of this bright summery card.  We've got one week left of school around here, but things are definitely winding down.  I'm not sure what we'll be doing all summer besides a lot of swimming.  Hopefully I can manage to do more stamping with all of the kiddos around.  Maybe we'll be stamping together during naptime.

This card features NEW STAMPS and NEW IN COLORS!!!  I used the Build a Birthday set that is in the new 2015-2016 Stampin' Up Catalog that starts next Monday.  Even after 17 years of being a Stampin' Up! Demonstrator (yikes! has it been that long?), I still get excited for new catalogs!  I used the new In Colors Watermelon Wonder and Cucumber Crush along with some trusty old favorites--Daffodil Delight and Tempting Turquoise.  I stamped the "make a wish" from the Perfect Pennants stamp set.  The letter a is stamped and then punched out with the 1/2" circle punch.  I made the banner out of Watermelon Wonder card stock by punching a strip of paper on each side with the hexagon punch.  The candles are tied up with some Daffodil Delight cotton ribbon.  To mimic the cucumber and turquoise candles, I textured the turquoise background with the Decorative Dots embossing folder.

Today's card was inspired by the current challenge over at Stampin' Royalty.  The challenge is "what's old is new again" so I looked through my old cards for some inspiration.  I found this card that I made last year and used it as my "before" and my new card is the "after."  Hope you enjoy!


 Pin It

Wednesday, May 13, 2015

Bold Butterfly Birthday

Last weekend I was searching through photos on my computer, in hopes to find just the right photo for a Mother's Day project.  While I didn't find what I needed (so I did a little last minute photo shoot), I did find this card that I made for my Mom last fall.  I loved how it all came together so I photographed it with the intention of posting it on my blog.  Well, better late than never!

I chose the colors of Daffodil Delight, Coastal Cabana (I'm so sad to be saying goodbye to this color), and Bermuda Bay.  I stamped the butterflies from the Papillon Potpourri stamp set and the Happy Birthday from the Hey You stamp set.  I punched out my greeting with the wide oval punch and added a punched butterfly as well.  I tied up the layers with some Daffodil Delight seam binding ribbon and textured the background with the Lovely Lace embossing folder.


Pin It

Monday, April 27, 2015

Amazing Hearts and Circles

I ran across a card a while back and can't remember how I stumbled upon it (I think on pinterest but I didn't pin it).  Anyway, I remembered seeing circles down the side of the card and loved the use of various patterned papers.  I decided to try the idea out for this week's challenge over at The Card Concept.  The patterns and the colors in the challenge photo inspired my use of multiple patterns and colors (Melon Mambo and Basic Gray).  I chose to go with a Clean and Graphic style where my text is the only actual stamping.  I used circle punches and the heart from the Itty Bitty Accents punch pack as my simple embellishments.

Pin It

Sunday, April 26, 2015

Stampin' Up! Butterfly Thoughts

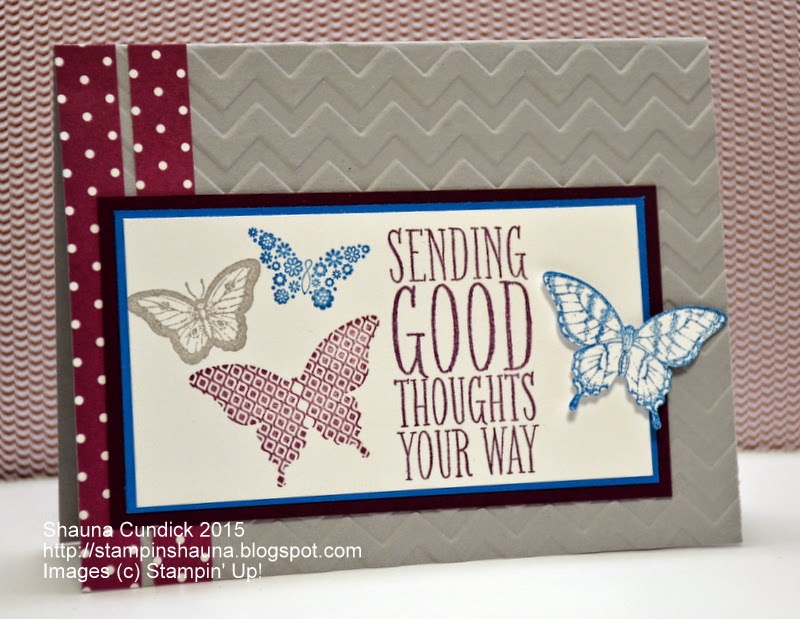
Today's card inspiration is brought to you by the blog challenges over at Freshly Made Sketches and Stampin' Royalty.  It's fun to combine a sketch challenge and a color challenge and see what turns out.  I started this card with no set plan (except to incorporate the challenges) and I think it turned out nicely.  I grabbed the challenge colors (Pacific Point, Rich Razzleberry, Blackberry Bliss, and Smoky Slate) and then decided to turn the sketch sideways.

I started out by stamping the greeting (from the Perfect Pennants set) in Blackberry Bliss and then added the butterflies (from Papillon Potpourri) stamped in Rich Razzleberry, Smoky Slate, and Pacific Point.  I punched out the large blue butterfly---love those coordinating punches, and popped it up a bit with a Stampin' Dimensional.  The stamped panel is mounted on Pacific Point and Blackberry Bliss.  I added some texture to the Smoky Slate card base by using the chevron embossing folder and then added the polka dot stripes (Backgrounds DSP stack) along the side to complete the sketch. 


Pin It


Wednesday, April 22, 2015

Double Pink Blossoms

I've been hooked on blog challenges lately, but I do stamp cards just for fun as well.  Today's post is one of those cards.  I pulled out my Mother's Love stamp set from the Stampin' Up! Occasions Catalog and created from scratch.  This is such a great set!  I love the two step stamps because it's so easy to add multiple colors (the outline and the inside) with very little effort.  I used Melon Mambo and Pink Pirouette for my color combo.  My card base is textured (surprise, surprise--can you tell I love the embossing folders?).  I used the Spring Flowers embossing folder.  I added some polka dot paper from the Brights Backgrounds DSP stack and tied some Pink Pirouette ribbon above it to divide it from my stamped panel.  I stamped the "for you" which is also from the Mother's Love stamp set and then punched it with the pansy punch. 

 Pin It

Monday, April 20, 2015

Soft Hello Stars

A few days got away from me, but I'm back with more card ideas.  There are a few challenges that I wanted to make sure to play along with, so to help catch up, I combined two challenges.  I made this card for a sketch challenge from Freshly Made Sketches and a photo inspiration challenge from Stampin' Royalty.  I chose the soft colors from the photo, so I decided to use Soft Sky and Crumb Cake to mimic those colors.  I also added the star elements because of the photo.  For the sketch, I wanted to think outside of the "box" a little, so instead of using an image or text box, my text (the hello from the hello you framelits) fills the space of the box.  I textured the white card stock with the Lucky Stars embossing folder (I just love those embossing folders).  I stamped stars from the Pictogram Punches stamp set on the Crumb Cake card stock and then added an additional Crumb Cake and Soft Sky star next to my text.  To tie everything together (literally), I used some soft Crumb Cake seam binding and then adhered everything to my Soft Sky card base.

 Pin It