Friday, November 30, 2012

Merry Bold Snowflake

I held my Christmas Card Buffet earlier this week and now I'm getting around to posting another card that we made.  This card features the new Bold Snowflake stamp (one of Stampin' Up!'s clear mount single stamps available through the end of the year) along with the "merry" stamp from the Snowflake Soiree set.  I love how the bold snowflake coordinates with the blossom punch.  I wanted it to stand out from the white word background, so I layered a green blossom punch behind the stamped layer.  I used Garden Green and Real Red for the card--the most traditional red/green combo.  My card base is textured with the Petals-a-plety embossing folder.  Do you recognize this layout?  Check out this card for my inspiration.

Pin It

Thursday, November 29, 2012

Clean and Simple Bird

Here's another card that I made for my mom's box of cards.  I wanted a clean and simple, yet fun card.  I chose Melon Mambo and Lucky Limeade to go along with all of the white space on the card.  The bird and branch come from the Best of Everything stamp set.  I textured my background with the petals-a-plenty embossing folder.  The green polka dots come are from my favorite Patterns DSP and then mounted on some Lucky Limeade card stock that I punched with the scalloped edge punch.  This was a quick card to put together and it added some great variety to the other cards that I made.


Pin It

Tuesday, November 27, 2012

Sunny Butterflies

What a gorgeous sunny day we are having!  It's 50 degrees and sunny, the mounds of snow we have are melted, and it just makes me happy!  Most years it seems like we really get cheated out of those perfect Autumn days, but this year they keeep coming back (after cold spells and storms).  I hope they keep coming!

Tonight I'm holding my Christmas Card Buffet but I decided that I needed to share a sunny card to mimic the day instead of a Christmas card.  This is another of the cards that I made a stack of for my mom's birthday.  It's similar to this card that I made back in September and this card that I made last month.  I just love switching up the colors and coming up with a whole new feel for the card.  I think today's card is my favorite of the three.  I did not add words to the card upon my mom's request to have some generic (wordless) cards.  I picked the more ornate patterned paper from the brights Patterns DSP stack so that it could hold its own without words.  My colors are Daffodil Delight, Pacific Point, and Tempting Turquoise.  I really love the butterflies from the Papillon Potpourri stamp set and it's funny to realize that I didn't even notice this set in the new catalog until I saw a few ideas online a few months ago--then I HAD to have it and it has become a favorite!  I textured my background with the petals-a-plenty embossing folder and then added some daffodil seam binding ribbon around the layers to complete my card.  I hope you get to enjoy a sunny day soon (if not today)!

Pin It

Monday, November 26, 2012

Polka Dots for Christmas

Christmas is less than a month away!  Are you getting ready?  We (okay, my husband) put up the Christmas lights on Thanksgiving.  My kids LOVE the Christmas lights and it is so fun to watch their excitement every time they see them, so I encouraged my husband to get them up so we could turn them on Thanksgiving night.  My husband is one of those guys who doesn't like Christmas music or Christmas lights on before Thanksgiving, so we settled for the first day he'd turn them on.  It's fun to take little drives around the neighborhood and listen to the kids' excitement over even the simplest light displays.

Tomorrow and Wednesday I am holding my annual Christmas Card Buffet where we'll be making a bunch of Christmas cards.  My intention is to have this class at the end of October each year, but this year the last month has really gotten away from me.  Oh well, at least it is happening before December!  This is one of the cards that people have the option of making.  I made one similar to this a few months ago, but I had to modify it so that I had the right supplies for the class.  I used the Scentsational Season stamp set for the tree and star and the Embellished Events set for the greeting.  Colors are Gumball Green, Raspberry Ripple, and Daffodil Delight.  I textured the background with (my favorite) Perfect Polka Dots embossing folder to mimic the dots in the Christmas tree.  I also added some polka dot paper (another favorite) from the In Color Patterns DSP Stack and mounted that on some white that I punched the scallop trim border punch along.  I finished things off with the Raspberry Ripple stitched satin ribbon around the pattern paper.  Happy 26th of November!!!

Pin It

Sunday, November 25, 2012

Primary Pinwheels

I gave my mom a whole box of stamped cards for her birthday this month.  She has been asking for cards for a while and wanted some birthday and then some all occasion cards (cards without words on them).  I stamped several cards in a few designs of birthday cards for her and then went to work on the all occasion cards.  I'm finding that I have a hard time not putting words on cards.  This card uses primary colors (real red, daffodil delight, tempting turquoise, and pacific point) and the pinwheel stamps from the Sweets for the Sweet stamp set.  Once I had everything stamped, mounted, and a ribbon tied around it, it was missing something.  I textured the background with the perfect polka dot embossing folder and it was still missing something.  Do you know what that something was?  Words.  Yep, I just couldn't leave it blank, so I turned to the Made for You stamp set and used the "especially for you" stamp.  I figured these words were harmless enough, they could be used for anything.  Birthdays.  Hello.  Congrats.  Whatever.  That way I could add the words and still have it be an all occasion card.  I'll keep trying to make some wordless cards, but sometimes the words just help finish off the card. 

Pin It

Friday, November 23, 2012

Circles and Presents

Have you ordered from the Online Extravaganza yet?  I just LOVE some of the sets that are 50% off!!!  I have to admit that I was a little bummed that I just ordered a couple of the sets, like less a month before they were on sale, but I guess I've gotten some enjoyment out of them in that time.  Okay, confession, one of the sets has not even been used yet, but at least I took advantage of some of the others that I didn't already have.  My order should come on Monday so I'll have some new rubber to stamp with.

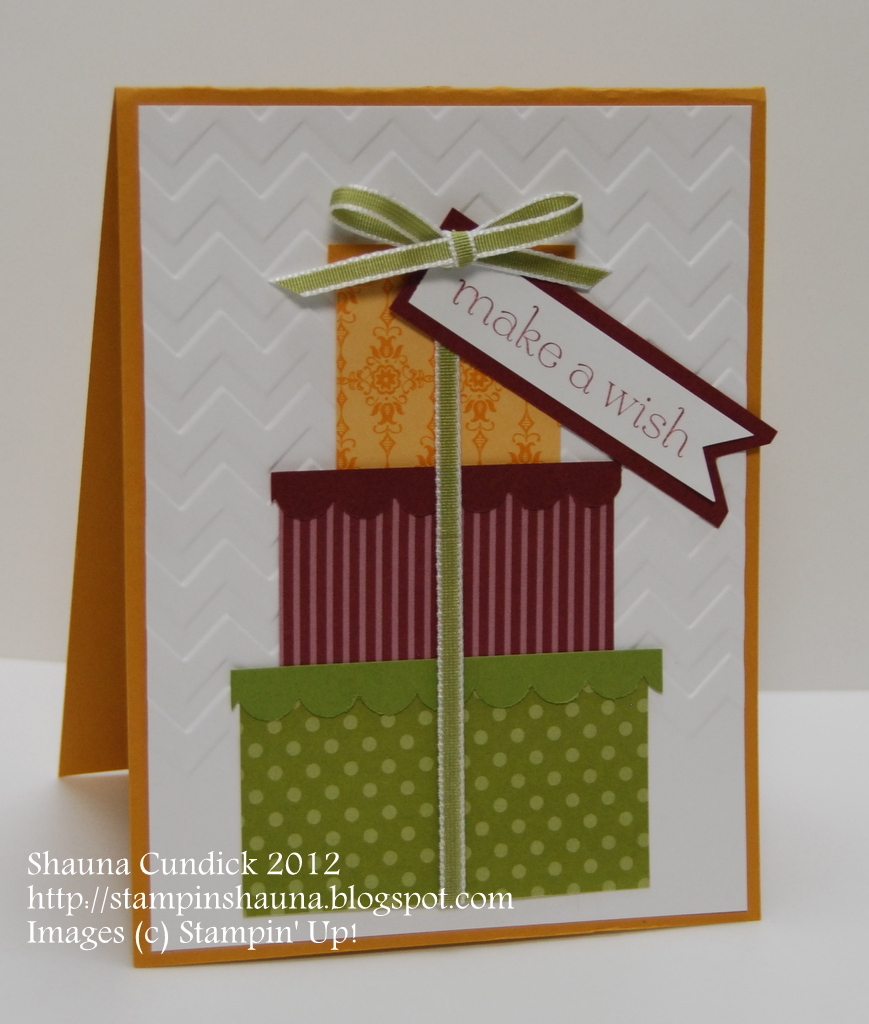
I made this card a couple weeks ago, before I knew about the sale.  I used one of my favorite birthday stamp sets--Patterned Party, which just happens to be on sale right now.  If you don't already have it, you should get it while it is HALF PRICE!  You can't beat that.  I came across some pre-cut card stock from one of my 2011 classes and decided that I ought to use it up.  I started out with the supplies from this card and then got busy stamping.  I stamped my presents in Marina Mist and layered them on the same colored card stock.  I added a strip of Marina Mist card stock to the inside edge of the card so that it would highlight my scalloped edge.  The patterns in the presents inspired me to add more patterns to my card, so I stamped a panel with stamps from the Circle Circus set in Pink Pirouette, Certainly Celery, Marina Mist, and Basic Gray.  I mounted everything on my card base that I textured with the Perfect Polka Dots embossing folder.  Finally, I finished it of with a bit of seam binding ribbon.
 Pin It

Friday, November 16, 2012

Swirled Snowflakes

A couple weeks ago my friend Pam asked if I had the Snow Swirled stamp set.  She borrowed it and made a card similar to this.  I loved how she used red and green and gray together, so I used some elements of the card (the snowflake background, the greeting, and the diagonal ribbon) and changed up the rest a bit to create my own.  I changed the red to Cherry Cobbler, the olive to Garden Green and left the Basic Gray.  I also loved how she used ribbon on the card and just glued a piece diagonally--I did this with the Cherry Cobbler seam binding ribbon.  The verse also comes from the Snow Swirled stamp set and is punched with the wide oval punch and layered on the Decorative Label Punch.  I wanted it to stand out a little, so I added the blossom punch behind it.  I figured it has 6 sides like a snowflake, so why not?

This week's challenge on Hand Stamped Sentiments is to make a card with Snowflakes, so here it is.  Hope you enjoy!


Pin It

Thursday, November 15, 2012

Candy Cane Duo


I consider myself a "brights" girl when it comes to selecting colors to stamp with (Stampin' Up! has 4 color collections: brights, regals, subtles, and neutrals).  Most of the year the brights are my go to group of colors, they just make me happy.  Now that it is Fall and Christmas is coming, I am loving all of the color combos lately, and find that the regals mixed with neutrals are some of my new favorites.  My card here was made with Sahara Sand and Cherry Cobbler, the current combo of colors at Dynamic Duos.  I also combined those colors with the layout at Mojo Monday.

I textured my background with the Chevron embossing folder and then added a strip of paper from the Be of Good Cheer DSP pack.  I stamped the candy canes from the Scentsational Seasons stamp set and cut them with the coordinating framelits.  My greeting comes from Teeny Tiny Wishes and is stamped on crumb cake card stock then layered on cherry cobbler that I punched with the scallop edge punch before layering it on some white card stock (so that the cherry layer would stand out from the dsp paper).  I tied those layers together with some Cherry Cobbler seam binding ribbon and added them to my card base.  Thanks to the fun blogs for the color and layout inspiration!  35 days until Christmas!


Pin It

Wednesday, November 14, 2012

Gift Stack

It's so fun to be able to share ideas with each other online.   I saw an idea that inspired this card online, but it wasn't credited, so whoever made a card like this for a swap, thank you for the inspiration!  I took the idea she used of the stacked gifts and switched it up a bit.  I decided to make my card be a birthday card, so I chose some fun papers from the Patterns DSP stacks in the colors to go with The Paper Players challenge this week--Old Olive, More Mustard, and Bravo Burgundy.  I cut my designer series paper into rectangles and then made "lids" for each of the gifts by punching strips of the matching card stock with the scallop edge punch (I sized the strips just a tad longer than the gifts).  I wanted to keep my background clean and simple so that the gifts would really stand out, so I used white for a background color.  It needed some texture in the background to go along with all of the fun patterns, so I textured it with the Chevron embossing folder before mounting it on my More Mustard card base.  I used some Old Olive 1/8" Taffeta Ribbon to "tie" my gift stack together and then made a tag with card stock and the Sweet Essentials stamp set.  The bow is actually a separate piece of ribbon that I tied and then adhered with a mini glue dot on top of the tag.  This is a fun idea that could be used for Christmas as well. 


Pin It

Monday, November 12, 2012

Rich Red Ornament

So many great challenges, so little time to stamp!  I've had quite a list of sketch and color challenges that I've wanted to try out and I didn't get nearly the amount of stamping time that I hoped for this weekend.  There were a few challenges that were due today, so I decided to combine a couple so that I could realistically complete them.  This is the card that I came up with for the fabulous color challenge at colourQ and for the awesome sketch challenge from Freshly Made Sketches.  You'd think that with the colors and layout already selected the card would be quick and easy to put together.  Well, the challenges definitely inspired me, but this card took some time and a bit of trial and error.  Originally I wasn't thinking Christmas when selecting the colors (Cherry Cobbler, Daffodil Delight, Crumb Cake, and Soft Suede) but then I started creating and I knew I wanted to use the Ornament Keepsakes set and the Lacy Brocade embossing folder.  I love how this turned out--a rich, bold Christmas card that still uses the traditional red but really doesn't need any green.  I used my matching framelits to cut the ornament and then layered it onto the Crumb Cake circle that I textured with the Perfect Polka Dots embossing folder and punched with the 2-1/2" circle punch.  That is layered on a scalloped circle cut with the perfect pennants big shot die.  My designer paper is from the Floral District dsp (the yellow) and the Neutrals Patterns dsp (the suede dots).  I stamped the greeting from Teeny Tiny Wishes and punched it with the word window and modern label punches.  I finished off the card by adding some 1/8" taffeta ribbon in Daffodil Delight to "hang" my ornament.
 Hope you enjoy!


Pin It

Sunday, November 11, 2012

Saffron Blossom Trio

I am already excited to see Spring blossoms.  I know, I know, I should just enjoy the seasons, but this 12+inches of snow we've gotten is a bit much for me.  My kids, however, are loving the cold white stuff.  Maybe I just need to actually get a pair of boots so that I can stomp around in it with them.  My daughter says it isn't Winter yet (because she pays a lot of attention to what the calendar says), so it should still feel like Fall for another month, right?

Since I'm in this Winter denial, I opted to stamp with flowers once again.  I chose the Summer Silhouettes set for the flowers and Sweet Essentials for the greeting.  I used the color combo from Stampin' Royalty: So Saffron, Pumpkin Pie, Gumball Green, and Chocolate Chip.  I textured the background with the Petals-a-Plenty embossing folder (just along the top 2/3).  I wanted to add more patterns, so I used some of the Pumpkin Pie colored paper from the Polka Dot Parade DSP and then tied my stamped panel with some Gumball Green Stitched Satin Ribbon.  Now, can we just cross our fingers that this snow will melt and we can get back to Fall?  I still need to take pictures of my kids in their Halloween costumes, and I'd like to do it outside with the leaves.


Top Picks

Pin It

Saturday, November 10, 2012

Patterned Boy Birthday


My mom has mentioned a few times that she'd really like me to make her more cards.  Sometimes she sees my card samples and reminds me that she needs some birthday cards, so today I decided to get with it and stamp some for her.  I wanted to try out the color combo from Just Add Ink and I figured a birthday card would be a great way to use the colors.  I have a tendency to stamp with more feminine colors, so combo (Tangerine Tango, Marina Mist, Sahara Sand, and Early Espresso) was a great way to get me to make some boy birthday cards that my mom can use.  I started with the Tangerine card base and textured it with the Chevron Textured Impressions folder.  I stamped my panel with the Patterned Party set and then speckled it with an Early Espresso Stampin' Write Marker and my color spritzer.  I like the speckled look and it helps fill in some of the white space.  I layered that panel onto Marina Mist and Early Espresso and then tied it all together with some Early Espresso stitched grosgrain.  I stamped the "happy birthday" from the Happiest Birthday Wishes set and then cut it into a banner shape by using a square punch at an angle.  Now I've got a stack of boy cards, next up for my mom will be some girl cards.


Pin It

Friday, November 9, 2012

Hand Stamped Silhouettes

As you can probably tell, I love doing challenges.  I think my favorite challenges are color challenges because they allow for the most creativity and freedom with the choice of stamps and the layout of the card.  This is the card that I made for the current color challenge from Hand Stamped Sentiments -- Early Espresso, More Mustard, Old Olive, and Elegant Eggplant.  I think I needed to stamp with flowers to help me get over the fact that Winter (or at least Winter-like weather) is upon us.  I'm afraid our beautiful 60 and 70 degree days are behind us and the harsh reality of snow is going to occur all too often for my liking.  In fact, it is snowing now and is supposed to most of the weekend.

So, to get my mind off that cold, wet stuff, I chose the Summer Silhouettes stamp set to go along with these rich Fall-like colors.  My greeting comes from the Made for You stamp set and is stamped with Early Espresso.  I tied some Early Espresso stitched grosgrain around my top two layers and then mounted them onto Old Olive.  My card base is Elegant Eggplant and I textured it with the Perfect Polka Dots embossing folder (although it is a little hard to see in the photo).  I added a 2" strip of patterns dsp to the bottom of my card to mimic the textured dots before mounting all of my layers on top of it.  I really enjoy building my own little garden with this stamp set, now if I could just get my real garden to look like that!


Pin It

Thursday, November 8, 2012

Ornament Keepsakes In Color

As I've been working on Christmas cards, I've been trying to come up with color combos beyond the traditional red and green.  For this card, I used the new Ornament Keepsakes stamp set along with some of the 2011-2013 In Colors.  I chose Wisteria Wonder, Pool Party, and Island Indigo to echo the cooler days of Winter.  After stamping my ornaments and layering them, I tied some Wisteria Wonder Ruffled Ribbon around it and then layered it onto my Wisteria Wonder card base that I textured with the Lacy Brocade embossing folder.  If you haven't seen the embossing folder or ornament set yet, you can check out the Holiday Catalog and order through my website.

Pin It

Tuesday, November 6, 2012

Three Paneled Flowers

Here's a challenge for you.  Take one of your cards, keep everything the same except for the actual stamps.  That means, keep the same colors, layout, accessories, etc.--just change the stamps.  It's actually a great way to use up leftovers.  I made this snowflake card and shared it at a demonstrator swap a couple weeks ago where the others each made the card.  I had one set of supplies leftover, so I grabbed the Mixed Bunch set instead of the Snowflake Soiree set and made this card.  I love how versatile stamping is!

Other supplies used: Polka Dot Parade DSP, Midnight Muse stitched satin ribbon, Marina Mist, and Midnight Muse ink and card stock, Baja Breeze card stock, decorative label punch, Sweet Essentials stamp set.

Pin It

Monday, November 5, 2012

Red Snowflake Trio

When Stampin' Up!'s Holiday Catalog debuted, I didn't think I "needed" another snowflake stamp set.  I have so many, most of which are retired so I can't demonstrate them anymore (but that doesn't keep me from collecting and occasionally using them for personal use).  After passing by the Snowflake Soiree stamp set several times, I was placing my second order from that catalog and decided that I should indeed add it to my snowflake collection.  I'm so glad I did! 

I loved the colors from the Pals Paper Arts color challenge this week--Riding Hood Red, Crumb Cake, and Very Vanilla.  I built this card from the ground up (meaning that I started with my card base and then my layers and then added the stamps very last.  I used the striped paper from the Regals Patterns DSP stack and mounted that on Riding Hood Red card base.  I textured my Crumb Cake card stock with the Chevron Textured Impressions folder and tied some Very Vanilla seam binding ribbon around it before mounting it on some Very Vanilla card stock. My snowflakes are stamped with Riding Hood Red ink onto Very Vanilla card stock and then punched with the 1-1/4" square punch, then those squares are mounted on red squares punched with the 1-3/8" square punch.  In the past I've had a tendency to stamp snowflakes in more traditional snowflake colors like white or blue, but this year I've gone away from the norm and have had a lot of fun stamping them in all sorts of colors.  I really like them with this color palette.

PPA 146 Nov 1 2012
Pin It

Sunday, November 4, 2012

Merry Snowflake

I'm trying to get in the Christmas mode with my stamping, but it seems that I keep reverting back to Fall (which only makes sense because it IS Fall).  I am needing to make a bunch of different Christmas cards so that I can plan my next stamping class, which I'm hoping will take place next week.  Here is a card that I might offer at the class, what do you think?

I used the Snowflake Soiree stamp set for both the words and the snowflake.  I stamped the Merry multiple times in Riding Hood Red and then just once in Garden Green to highlight it.  I then mounted my stamped layer on some Riding Hood Red card stock.  I stamped the large snowflake in Garden Green and then punched it out with the blossom punch--isn't that a cool use for it?!  I wanted the snowflake to stand out against the busy background, so I added a garden green punched blossom behind it.  I textured my card base with the petals-a-plenty textured impressions folder and then layered everything onto it.  Do you recognize this layout?  Check out this post.


Pin It

Saturday, November 3, 2012

Four for Fall

Today was another gorgeous fall day, so we spent a lot of time outside.  Just about all of the leaves in our front yard have fallen and are now cleaned up (thanks to my hubby) but there are still a bunch in the back that need to fall.  We are still enjoying some of the fall color, although most of the colors are different shades of brown at this point.  I let the leaves inspire my card for this week's Freshly Made Sketch and SUO Challenges.

I stamped leaves in Riding Hood Red, More Mustard, Cajun Craze, and Soft Suede and then punched them with my 1-1/4" square punch.  I layered those squares onto Soft Suede squares that I punched with the 1-3/8" square punch and adhered those to my bottom layers with some Stampin' Dimensionals.  I ran the mustard strip of card stock through my Big Shot with the Woodgrain Textured Impressions Folder and layered that onto more Soft Suede card stock.  My card base is Cajun Craze card stock with some Cajun Craze Patterns DSP.  I looked through my ribbon stash and decided on the Early Espresso stitched grosgrain ribbon (in person it blends a bit better with the colors, for some reason it seems like quite a contrast).  I love this layout with the four squres and I think I want to try it out with some Christmas stamps next.


Pin It

Friday, November 2, 2012

Topsy-Turvy Birthday Invitation

Thanks to those of you who went and voted for our little costume contest that I mentioned in the previous post.  So far we are in the lead and voting continues until the 7th, so hopefully we can keep that lead.

I wasn't able to sneak away and stamp today, but I did realize that I haven't posted this idea yet.  We celebrated a birthday in our home last month and I hand-stamped the invitations.  I wanted to keep it pretty simple since I was in a hurry to get the invitations out, but I had to make it cute since I'm a stamper, so this is what I came up with. 

I used the Topsy-Turvy Celebration set for all of the stamping--I love that the "Celebrate" comes with that set too.  I stamped my cake layers in Pretty in Pink, Wisteria Wonder, and Certainly Celery and used the coordinating papers.  The polka-dot paper is from the In Color Patterns DSP stack (I know surprise, surprise).  Have I convinced you that you NEED some of the Patterns DSP stacks?  What did I ever do without them?!  I stamped the celebrate on white card stock and then punched it with the modern label punch and then glued everything onto my card base that I textured with the perfect polka dot embossing folder.  In this case my card base is just a postcard with the party info pasted onto the back.  I figured a bunch of little girls wouldn't care if I just did a card front and not a full card.  Luckily, I just handed the invitations to the parents as we delivered them, so they weren't in envelopes.  When we were about finished passing them out, I realized that the last two didn't have the party info on the back.  I'm glad I noticed, and am especially glad that I didn't just shove them in envelopes.  If someone wasn't home, it would be awful to leave a cute invitation without any info because they wouldn't know what or who it was for.  I'm glad I caught it and I know we won't make that mistake again.  It was definitely something to laugh about!  Do you stamp your invitations?


Pin It