Wednesday, October 31, 2012

Solo Wisteria Butterfly

I love color challenges!  Why?  Because it is so nice to be able to grab a few ink pads, a few packs of card stock, a stamp set, and sit down and create.  I have limited amount of time to stamp because of my busy kiddos, so I like to take advantage of that time.  I can create a lot faster when I have a specific color palette to work with.  I'm also using a lot of colors that may not be my "go to" colors, and I'm finding that I'm liking some of the colors that I had neglected.  This palette is one of those that I wouldn't have naturally put together, but I LOVE the results! 

Over at Just Add Ink, the challenge is to use Wisteria Wonder, Crumb Cake, and Very Vanilla.  In the past, I generally used Crumb Cake only with darker colors, but I'm finding that it is great paired with some of the lighter colors as well--and this is one of them.  I stamped my floral butterfly from Stampin' Up!'s Papillon Potpourri set, punched it with the Elegant Butterfly punch, layered that on a wisteria circle textured with the Petals-a-Plenty embossing folder punched with the 1-3/4" circle punch, layered that on crumb cake 2-3/8" scallop circle, and layered that on a 2-1/2" vanilla circle.  Sigh, that was a long description :)  I used some polka dot paper in Crumb Cake from the Neutrals Patterns DSP pack and layered that on Vanilla and Wisteria and tied it all up with some Wisteria Ruffled Ribbon.  I stamped the greeting from Embellished Events and cut it with the larger banner in the Bitty Banners framelits.  My card base is Very Vanilla card stock with some Wisteria Wonder Patterns DSP on it.  There are a lot of layers on the card, but I love how they all really come together with the colors.  Have you tried a color challenge recently?


Pin It

Tuesday, October 30, 2012

Saffron & Mustard Circles

I could have days like today almost everyday!  We had some snow last week and it was sad to think about how our pleasant fall days may soon draw to an end.  However, yesterday and today the sun was out, the jackets came off, and the kids and I played outside.  The weather seems to go perfectly with the color combo over at Dynamic Duos right now--More Mustard and So Saffron.  The shades of yellow are warm but not too bright, just like the warmer (but not too hot) fall days.  I used the Circle Circus stamp set and stamped three of the circles in the challenge colors (plus Basic Black).  I layered that panel on More Mustard and Basic Black card stock.  The polka dot strip is from the Regals Patterns DSP and is layered on Basic Black card stock that I cut with the large scallop edgelits die.  The greeting comes from Sweet Essentials and is stamped on a hand-cut banner and layered on More Mustard card stock.  Everything is mounted on a So Saffron card base that I textured with the perfect polka dot embossing folder. 


Pin It

Monday, October 29, 2012

Sassy Textured Thank You

Whew, what a weekend!  We've been celebrating birthdays and Halloween which is why I haven't been blogging as much.  I'll try to pick up the pace and get back to really posting every day, but family comes first.  Just on Saturday we cleaned up, entertained 10 kids for a couple hours, ate lunch, went to a spudnut party, did trick-or-treating at two grocery stores, went to a trunk-or-treat, went out to dinner, and had some friends over for cake and ice cream.  We were beat (at least the adults were, the kids could have done it all again)! 

After such a weekend, I didn't have time to come up with anything new, but I do have this card to show you.  I made a set of them a couple weeks ago for a friend.  If you've been following my blog for a while, you should recognize the layout of the card.  See here and here.  She saw those cards but wanted me to make some with the colors shown here (Perfect Plum, So Saffron, and Certainly Celery).  I love how changing up the colors changes the card so much.  I didn't have enough of any fancy brads, so I stamped a small flower circle from the Mixed Bunch set and then punched it with the 1/2" circle punch for the center of my flower.  The flower is punched with the blossom punch and is textured with the petals-a-plenty embossing folder.  I made the leaves with the 5-petal flower punch.  The "thank you" is from the Sassy Salutation stamp set--I love how fun that font is, it can really hold its own on a card.  This reminds me, I need to get a couple thank you notes sent out.  I make a lot for samples and card ideas, but I need to be better about sending them.  How about you?

Thursday, October 25, 2012

Pink & Espresso Birthday Butterflies

I love how you can switch up stamp sets or colors and have a whole new card to look at.  I originally made a card with this layout using gray and green and a friend of mine saw it.  She loved the card, but wanted me to make her some cards like it but in different colors.  I know that she likes pinks and browns, so this is what I came up with.

I chose to use Pretty in Pink and Early Espresso with my Papillion Potpourri stamp set.  I stamped butterflies all over the white card stock and then added a strip of Pretty in Pink Patterns DSP to the bottom of it.  Both of those got mounted to some Early Espresso card stock and then tied with some Espresso stitched grosgrain.  I wanted my card base to have some texture, so I ran it through my Big Shot with the Petals-a-Plenty folder to mimic the flowers onto some of the butterflies.  My greeting is from Sassy Salutations and is stamped with Early Espresso ink.  To finish things off, I stamped an Early Espresso butterfly, punched it with the Elegant Butterfly Punch, and then mounted it onto the bottom of the card with some Stampin' Dimensionals.  Have you noticed that Stampin' Up! has a lot of stamps with butterflies, birds, and other animals?  This week's challenge at SUO Challenges is to use one of Stampin' Up!'s animal stamps on a card.  What do you think of mine?  I'm glad that butterflies count, because I sure love this stamp set.  Funny thing about this set is that when I first got my new catalog, I didn't really notice this set.  Then I saw a few ideas with it and decided to get it just for fun, and now it is one of my favorite sets!


Tuesday, October 23, 2012

Jack's Chevrons

Halloween is just over a week away, so I figured I'd better share another Halloween card.  I made this one with Stampin' Up!'s Jack of All Trades stamp set.  I stamped my pumkin, face, and stem and then punched it out with the 2-1/2" circle punch--love that punch!  I then started my layering....Gumball Green card stock textured with the Chevron embossing folder, white card stock, Pumpkin Pie polka dot paper from the Polka Dot Parade dsp pack, more white card stock that is punched with the scallop edge punch, and finally my Pumpkin Pie card base.  This goes along with the theme over at Just Add Ink right now, which is to just add Chevrons.

Are you ready for Halloween yet?  We've got the costumes figured out, but still need to decide on some treats (or tricks).  If you see us, you'll see some of your friends from Peter Pan.  Yep, we're doing the themed thing--Peter, Wendy, Tink, and Captain Hook. 


Pin It

Monday, October 22, 2012

Banner Birthday Cake

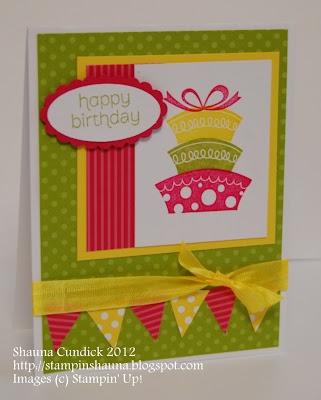
We have a birthday coming up in our family.  In fact, I need to get busy and make some birthday party invitations!  When I saw that sketch challenge on the Stampin' Royalty blog, I knew I wanted to make my card a birthday card.  I chose my colors (Melon Mambo, Daffodil Delight, and Lucky Limeade) and the Topsy-Turvy Celebration stamp set and went to work.  I love the Patterns Designer Series Paper Stacks, so I had to incorporate some of those papers (in Melon Mambo and Lucky Limeade) and I also used some of the Daffodil Delight paper from the Polka Dot Party dsp pack.  I tied some Daffodil Delight seam binding ribbon around my card and then added in some hand-cut pennants to make my birthday banner.  I stamped the greeting from the Made for You set and punched it with the oval and scalloped oval punch and adhered it with some Stampin' Dimensionals.  I think a special someone in my family will like her birthday card, I know I do!


Top Picks
Pin It

Sunday, October 21, 2012

Textured Raspberry Petals

My very favorite products for the Big Shot are the Textured Impressions Embossing Folders.  I love adding a bit of texture to an otherwise plain background, it really adds a lot to a card.  This week over at Hand Stamped Sentiments there was a technique challenge--to ink up an embossing folder.  This was a fun challenge as I haven't inked up a folder before. 

I started this card by taking my Petals-a-Plenty embossing folder and rubbing my Raspberry Ripple ink pad all over it.  I wasn't sure which side I'd want to use for my card, so I actually inked up both sides before putting my white card stock in it and running it through my Big Shot.  I chose the side that had inked the flowers, leaving the background white.  I mouned that on some Raspberry Ripple card stock and used my scallop edge punch along the bottom.  Then I tied some Raspberry Stitched Satin Ribbon around the layer before mounting in on black, white, and finally my Raspberry card base.  I wanted to keep the petals as my focal image, so I just added a greeting from the Made for You set to finish off the card.  That is punched with the oval punch and the scalloped oval punch and adhered with Stampin' Dimensionals.  Have you tried inking up an embossing folder yet?


Pin It

Friday, October 19, 2012

Snowflake Panels and Polka Dots

I stumbled upon a new sketch challenge site today and had to try out the current sketch from Unscripted Sketches. I liked the panel look of the stamped layer, it makes it so visually interesting to look at.  I decided to make a winter card with the Snowflake Soiree set.  My greeting comes from the Sweet Essentials set.  I used the "Make a Wish" stamp and just inked the "wish"part of the stamp (although I'm not wishing for snow anytime soon).  I punched it out with the designer label punch--punched the tall way.  I picked three blues for my snowflakes--Baja Breeze, Marina Mist, and Midnight Muse.  The Marina Mist polka dot paper is from the Polka Dot Parade DSP pack.  I tied some Midnight Muse stitched satin ribbon around the card and tucked it under my punched greeting to finish it off. 


Pin It

Thursday, October 18, 2012

Regal Butterflies

How to describe this week's color challenge over at The Paper Players?  Rich, fall, regal.  At first I knew this would be a great combo for some fall leaves, but then I challenged myself to come up with something else.  I stamped these regal butterflies in Cajun Craze, Bravo Burgundy, and Night of Navy.  These color challenges are so good for me.  They help me put together colors that I may not otherwise combine on a card, and they get me using some of my colors that I've ignored for a while.  I haven't stamped in Bravo Burgundy since last Christmas!  Over the past couple of months, I've fallen in love with Cajun Craze.  I knew it would be a good color for fall, but it works with a lot of different combos!

I used several butterflies from the Papillon Potpourri stamp set to stamp my Very Vanilla card stock.  The greeting comes from Sassy Salutations.  After stamping the card stock, I cut it into 3 sections (two are 1-1/4" and the bottom is 1-1/2" tall).  I then mounted those strips on Bravo Burgundy and then on some Cajun Craze Patterns DSP.  I tied some Navy stitched grosgrain around those layers and then mounted them with Stampin' Dimensionals on my Night of Navy card base that I textured with the petals-a-plenty embossing folder.  I sure love those embossing folders, they add so much rich texture to otherwise plain pieces of card stock.


Pin It

Subtle Snowflakes

Here's my card for the current challenge over at Dynamic Duos--Pool Party and Soft Suede.  It sure is nice to just grab a couple ink pads and a couple packs of card stock and start creating!  I wanted my card to be something a little different than I usually do so I picked this clean and simple layout.  When I've been prepping for classes lately, I'm realized that I'm having to cut a bunch of layers for one card and that I need to simplify a bit.  Simple is beautiful.  I wanted to use a crisp and elegant set to go along with my simplicity, so I chose Stampin' Up!'s Snowflake Soiree stamp set.  I stamped a small snowflake in Pool Party all over the background of half of my card.  I then used the color spritzer to add speckles in the white space on that same half (after all, snow falls in various sizes so I couldn't just use the small snowflake stamp).  I then inked up a larger snowflake in Soft Suede and stamped that over the top of the background I just created.  On the other half of my card, I stamped the Believe stamp (also from the Snowflake Soiree set) and one more Pool Party Snowflake.  To separate the two sides, I tied some Pool Party seam binding ribbon around it and layered everything to my card base.


Pin It

Wednesday, October 17, 2012

Dots and Stripes Christmas

The challenge over at Just Add Ink is a theme challenge to just add something new!  The Polka Dot Parade Designer Series Paper is my favorite pack of paper, it was new with the current Stampin' Up! catalog.  I love the boldness of the white polka dots.  I combined it with the stripes of the patterns dsp for this card.  The polka dots in red mimic the polka dots on the Christmas tree from the Scentsational Season stamp set (my favorite new set in the Holiday catalog).  I stamped the greeting from the Embellished Events set.  This is a simple card to stamp, just two stamps punched out with the 2-1/2" circle punch.  The majority of the time spent on this card is just creating the layers, which doesn't take too long either--I love quick cards!  My colors are Real Red and Gumball Green (new In Color this year).  The white flags are 1/2 of the larger banner from the Bitty Banners framelits (new in the current catalog).  I textured the background with the polka dot embossing folder and tied some Gumball Green stitched satin ribbon around the card before adhering my stamped layer with some Stampin' Dimensionals.  I love using new products and finding ways to mix them with old products for great results!
JAI Badge 2011 HONORABLE MENTION!

Pin It

Tuesday, October 16, 2012

Flowers for You

I've been stamping up a storm lately!  Over the past several months I've been trying to take more time to create and stamp cards to share on my blog, link to challenges, show my customers, and use for classes.  It has been so fun making myself find a bit of time to stamp and I love sharing the ideas--hopefully I can keep this up!  I have not done a lot of mass-production stamping (where I stamp several of the same card so that I have cards on hand or to give as gifts).  A friend of mine wanted some cards to use for gifts and asked for my help, so I've been cranking the wheel and just finished my 19th set of cards last night!  Most of the cards are cards that I've already shown you here on my blog, but I decided I had to take a picture of one that I created just for her and share it before I give them away.

Her request was that I make a card with the Mixed Bunch set and use the greeting shown here (which comes from the A Word for You set).  I wanted something a little different than I've been doing lately and I wanted to use colors that I hadn't been using.  I hope she likes what I came up with, I know I do (in fact, I made myself a set of 6 as well).  I used Blushing Bride (now retired), Regal Rose, and Early Espresso.  Can you believe I didn't use any Patterns DSP?  I know, shocker!  I did, however, use one of my trusty textured impressions folders to make up for it.  I'm glad she requested the Mixed Bunch set because I LOVE that set and I have been ignoring it lately.  I used it a ton back in the Spring and then it got set aside when the new catalog came out and I need to not ignore such a great set.  If you don't have it, you probably "need" it because it is a fabulous set (and there is a matching punch)!  I stamped the images on a panel that is 2-3/4x4-1/4, which is exactly 1/8 sheet of card stock.  I guess I could have done the one-sheet wonder thing and stamped the whole sheet before cutting it, but I didn't think of that ahead of time.  A lot of time when I stamp, I just start stamping and then think of simpler ways to do things after the fact.  My greeting is punched out with the oval punch and the scalloped oval punch--a perfect little pair of punches!  Originally this card was just going to be the panel and non-textured background, but I experimented a bit and the polka dot background and greeting added SO much to the card I just had to "step it up" a bit.  Hope you enjoy your Tuesday!
Pin It

Monday, October 15, 2012

Candy Cane Splatter

I took the weekend off from blogging again, but I'm back!  I wanted to hurry and share a card that I made this morning to go along with the sketch at Freshly Made Sketches.  When I saw this sketch last week, I knew I wanted to try it with the Candy Cane stamp from Stampin' Up!'s Scentsational Season stamp set.  I really should start using some of my other new Christmas stamps, but I just can't get enough of this set!  I wanted to use the Be of Good Cheer DSP, so I chose Very Vanilla, Gumball Green, and Cherry Cobbler for my color palette.  I stamped candy canes randomly on my card stock and then filled in the white space with my color spritzer tool and Gumball Green marker.  I layered card stock and dsp and then tied some Gumball Green Stitched Satin Ribbon around the card before adding my greeting.  I stamped the greeting from the Embellished Events set and punched it with the oval punch, scalloped oval punch, and designer label punch.  What a fun sketch!


Pin It

Friday, October 12, 2012

Gray Starfruit Thanks

I made this card at the beginning of the week to play along with the color challenge over at Just Add Ink.  We were supposed to use Summer Starfruit, Basic Gray, and White.  I chose to use the Lacy & Lovely set and I stamped it all in Gray ink.  I added the Summer Starfruit with the Patterns DSP and the stitched satin ribbon. 

Well, I thought I was ahead of the game and had my card done a couple days early, then the card sat in my basement for a couple of days until I photographed it.  I then realized that the deadline is Australian time and I missed it--by just a couple of hours!  Oh well, I'm still glad I made the card and here it is for you to see.  I did my punch combo for the greeting--oval punch, scalloped oval, and designer label punch.  I really like how the three punches frame the greeting and add a bit of color.  Enjoy!

Thursday, October 11, 2012

Vivid Leaves Duo

It's time for another Dynamic Duo Challenge, and the challenge colors this week are Tangerine Tango and Old Olive.  I immediately thought of a fall card with these colors (and I happened to have my Gently Falling stamp set still out on my table) so that is what I used.  I stamped my leaves in the challenge colors and then used my color spritzer and Old Olive Stampin' Write marker to speckle all over the stamped strip.  I used the new wood grain embossing folder to give some texture to my Old Olive card base.  After layering my stamped strip on some Tangerine Tango and Early Espresso card stock, I tied some Early Espresso stitched grosgrain around the card.  I stamped my greeting from the Made for You stamp set and punched it with the oval punch and then layered it onto the decorative label punch that I also textured with the wood grain embossing folder.


Pin It

Wednesday, October 10, 2012

Christmas Cheer Cocoa

I love the images in the Scentsational Seasons stamp set (it's in the Stampin' Up! Holiday Catalog).  They are such a great size and I love how bold they are--which translates into just stamping/no coloring/fast cards!  This week's challenge over at The Paper Players is a Cup of Joy Theme Challenge where you make a card with a cup on it.  Here's my creation.  I was definitely up for the challenge because I have been giving a lot of attention to the other stamps in this set and I hadn't yet used the hot cocoa mug.  I picked my favorite Christmas color combo of the year--Raspberry Ripple and Gumball Green for this card.  I stamped my images from the Scentsational Seasons set and Sweet Essentials (word set).  I cut my greeting into a banner shape and layered it on some Gumball Green Stitched Satin Ribbon.  My card base is Gumball Green with Raspberry Ripple card stock and Patterns Designer Series Paper layered on it.  It won't be long until hot cocoa will really be in season, although I hope the cold doesn't come too soon!  This morning we were only in the 40s but by afternoon we had a gorgeous 75 degree day!


Pin It

Tuesday, October 9, 2012

Autumn Leaves for You

The falling leaves are in full swing around here.  We went up the canyon to see the leaves a couple weeks ago and they were just past the peak of their color.  Now the leaves in the yard are starting to fall, unfortunately they aren't quite as vivid as those up the canyon, but they are still pretty.  I love this color combo from Pals Paper Arts this week--Cajun Craze, More Mustard, and Early Espresso.  I have to admit that until just recently, I had not even used Cajun Craze (although I've had it since it debuted).  I'm finding that I use it quite a bit now, and not just when I have to for a color challenge.  It is a great color for this time of the year, and I like how it takes on more of a "red" tone with this combination of colors.

I used the Gently Falling stamp set for my leaves and then the greeting set called A Word for You.  Once I stamped the leaves, I wanted to fill in the empty space so I grabbed my color spritzer and specked the paper with my Early Espresso marker.  I've had a color spritzer for 15+ years and I think I love it more than ever recently--it seems to add just the right touch to some cards!  I mounted my stamped strip on some Early Espresso card stock and then on More Mustard that I paper pierced a dotted line along.  I tied those layers together with some Early Espresso stitched grosgrain and then mounted them on my card base, which is Cajun Craze.   I love adding texture from with Stampin' Up!'s Textured Impressions Embossing folders (and that is the challenge from SUO Challenges right now) so I textured my Cajun Craze card base with the woodgrain embossing folder.  My greeting is punched with the oval punch, then layered on the scalloped oval punch, and finally the designer label punch.

MustardCajunEspresso


Pin It

Friday, October 5, 2012

Cherry Candy Cane

Christmas is coming!  It seems like it is far away, but I think it will be here before we know it! Here's a quick and fun Christmas card idea.  I used the same colors from yesterday--Cherry Cobbler and Gumball Green.  The striped paper is from the Be of Good Cheer DSP pack.  I ran the strip of Cherry Cobbler card stock through the Petals-a-Plenty textured impressions embossing folder and I also ran the Cherry card stock that frames the Candy Cane through my Big Shot with the polka dot embossing folder.  This card uses the Scentsational Seasons stamp set along with the Embellished Events set (for the greeting).  Everything is mounted to a Very Vanilla card base and finished off with some Gumball Green Stitched Satin Ribbon.

Thursday, October 4, 2012

Texture, Patterns, and Christmas

It's been a week or so since I sat down and created a card, so it was fun to play along with the Dynamic Duos challenge this week to get myself back in the groove.  This week's challenge was to use Cherry Cobbler and your choice.  I decided to make a Christmas card, so I paired Cherry Cobbler with Gumball Green (with Very Vanilla as my neutral).  I love the Be of Good Cheer designer series paper, so I picked a couple of patterns from that for my card.  I stamped the polka dot Christmas tree from the Scentsational Seasons set and added "Merry Christmas" from Embellished Events and punched them out with the 2-1/2" circle punch.  I used some Gumball Green stitched satin ribbon to "tie" my patterns together and then added some vanilla banners (cut with the Bitty Banners framelits).  I mounted everything on my Cherry Cobbler card base that I textured with the perfect polka dots textured impressions folder.


Pin It